Sunday, 15 September 2013

the chairs: part II

See part I here

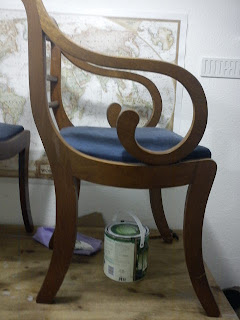
...And now for sanding. Gave my chair (the armless one) a keying, ready for some paint. I chose a garden furniture paint for durability. After sanding the back, I realised the chair had been varnished somewhere in between it's initiation and my purchase of it. It has a quite wonderful shiny brass inlay that had been varnished over:


Decided to paint right over the inlay for my chair.


I used 'tru oil' on the other chair which preserved the inlay nicely, and made it super shiny too:


the chairs: part I

I purchased a couple of second hand chairs many months ago with the intention of restoring/changing them; the armless one for myself, and the carver for my mother. This is a back blog from a few months back. Here they are as bought:


I began with re-upholstering them. Nice new squarey fabric:


Then I spent quite a bit of time 'fixing' my chair; in that one of the legs wasn't sitting straight. I took it apart, sanded, glued and re-set it, filled in the holey bits, but now that I've been using it, it's gone back to how it was before, which was a shoogly chair at best.

Part II here


Wednesday, 4 September 2013

sock blocking beats!

I have been working on a little drawing/design for some sock blockers, influenced by a combination of pictish carvings and polynesian tattoos. I have just begun to woodburn the design onto the blockers, which I cut and shaped out of MDF:


The other blocker will feature a different design, I'll update about that soon.

Sunday, 26 May 2013

knitted sock hanger

I have a south facing wall which I hesitate to put pictures up on, in case of fading etc., so I decided to make it a feature for my knitted socks, a wall-mounted washing line if you will. I thought dolly pegs would be excellent for this, so I painted a few of them badboys up:


and later drilled some holes in them. I don't have any more 'process' photos of me making it, so here it is the final product:


Thursday, 23 May 2013

framing/shaming

Following on from my previous post about frame-making, I bought a band clamp so I could cheaply and easily make some more frames (glass-less, obviously).


I ended up splitting the corners and re-setting it about three times, trying to get it straight. Also wrecked one of the corners trying to do the job of a rebate plane with a chisel, ha. But I filled it in and it's fine. The whole shitness of the frame correlates with the shabbiness of the painting, yes, that's my statement for that. 


7-inch vinyl box... that I didn't really make.

Been trying to find vinyl storage for a while now, decided to build my own instead, cue the 6mm MDF.
Previously I made a 12-inch vinyl box out of 12mm MDF, glue and nails, but it came out a little... sarah-y, so you won't be seeing it here.
So I came up with a similar design(minus the nails), cut the board, and began glueing:


After several hours of setting/clamping, it promptly fell apart. I brought in my father to do the job properly:


IT STAYED TOGETHER. I tried again with the next piece:


IT FELL APART AGAIN. Feeling like an utter failure at woodwork, I call on my father again:


PERFECT! So the box became his project after that - dads just know how to make shit out of MDF:


And I just painted it:


Nice one, dad!


Thursday, 16 May 2013

guitar wrecking/restoral

have an old 'checkmate' acoustic/classical style guitar from around 1969 - a Japanese mass produced effort so nothing special. thought I'd make some attempt at customising it/restoring it/could be ruining it forever, ha.
started this on the 16th February 2013, 3 months ago. here's the original:


see that bit of paper underneath the A string second from right, reckon that's been there since 1970. but without it the string buzzes, so will have to get a new nut. 

6th April 2013: and the sanding begins....


14th April 2013: finally got the fucker apart...
after much chisel knifing and malleting:


and a little bit of repair work:


that's all for now.